
After finding out that one of my children was intolerant to gluten and that his focus and behavior improved when he ate gluten-free, our family went about making gluten-free bread. While the rest of the family could make the bread, the task often fell to me to accomplish. Once I listened to enough people and read enough, I finally figured out how to make a really good loaf of gluten-free bread from the recipe that we had the ingredients to make. A phrase I would commonly use to describe how essential it was to follow the recipe procedures precisely was, “There is a madness to the method”.


This “madness to the method” is not only a good mantra for making bread, but for processing cucamelon (Melothria scabra) seed – especially processing a lot of it. After months of caring for the fruit and many hours of working to process the seed, I can emphatically declare that there is a “madness to the method”. So to break down the steps of processing cucamelon seed, lets start with the steps required to hand-process a small batch, then we will scale those steps up to hand-processing a large batch.
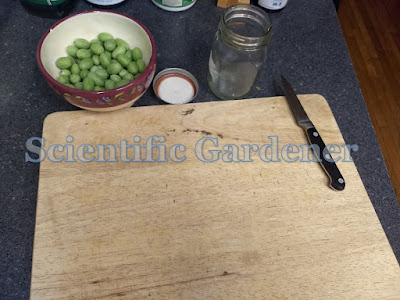


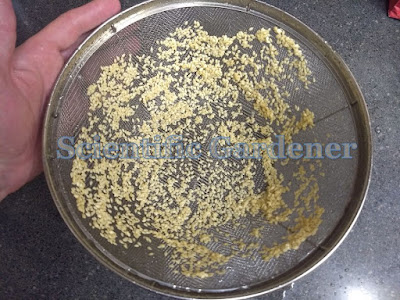
Small batch Cucamelon (Melothria scabra) processing: You will first need the following items: Gloves, a mason jar (big enough to hold fruit pulp), a cutting board, a knife, a colander to rinse the seeds in (with holes smaller than the seeds) and something to dry the seeds on. Gather all the little cucamelons you can from the plants and the ground around the plants. If you can, wait until the skin of the fruit is no longer shiny. After the fruit has filled out and the shine of the skin becomes dull, pick the fruit from off the vines or gather fallen fruit from off the ground. Rinse all of the fruit off and allow it to dry in a cool or moderately cool location. Once the fruit begins to become soft or wrinkled, separate the older soft and wrinkled fruit from the less mature fruit. Put on the gloves and using a knife on a cutting board, cut each fruit in half. Squeeze the contents of the inside of each half section of fruit into a clean mason jar, discarding the skin in the compost. At this point, you may want to double-check the inside of each half fruit to see if you are leaving any seeds behind in the fruit. If the gloves become torn or incur cuts, replace them. The acid from cucamelons does serious damage on hands (especially the cuticles) within as little as 15 minutes. Once the jar is 2/3 full, clean off the rim and tighten the lid just enough so air can pass by to release pressure. The pulp will take 1-2 weeks to ferment. During the fermentation process the pulp will turn from a pea green color to a darker shade. This color change, as well as the presence of large pockets of air or bubbles in the pulp will signify fermentation is occurring. To determine if fermentation is complete, tighten the lid of the jar, shade it vigorously, then slowly let the air out. When the pulp in the jar becomes loose and no longer produces pockets of gas in the pulp mass, the batch is done fermenting. Dump the pulp, a little at a time, into a colander and rinse out the pulp from one side of the colander to the other until the seeds become clean. Then put seeds on a paper plate or other clean surface to dry. Ensure that the seeds are properly dry, then blow out the excess bad seed from the batch, leaving only good clean seed. If needed, you can utilize a box fan for this purpose. Once the nonviable seed has been removed from the batch, pack into an airtight container and store in a cool dry location.


Large batch Cucamelon (Melothria scabra) processing: Large, storing and sorting, put the fruit into a 5-gallon bucket to ferment and check every couple days. Once a large portion of fruit begins to decay, use an electric whisk to beat the fruit. This can be done by using a immersion blender or, if you would prefer to save your energy, a large electric mixer like a Kitchen Aid™. If you took the pulp out of the 5-gallon bucket, put it back in and check every 2-3 days until the pulp begins to turn from a light green to a off-colored dark green. This will signal the end of the fermentation process. You may want to try using a whisk attachment again, just to make sure that the pulp has broken down enough. Then, put a small portion of the seeds in a fine colander and press the liquid out of them. Knead the pulp mass like dough again and again until most of the liquid is out. Rinse the pulp and knead again. Keep doing this until most of the seeds can be rinsed out. If there is any remaining pulp, you can add it to another batch and keep going. You can also put the pulp in the electric mixer to try to break it down even more. The general idea is to break down the pulp as much as possible without breaking down the seed. Once the seed is free of pulp, dry it as soon as possible. The pulp has some kind of compound that keeps the seed from germinating and clean seeds will quickly germinate if left in a moist area. If the seed has been mostly cleaned, but separating the last remaining pulp from the seed is problematic, you can use cold water in a bowl to rinse out the pulp, while keeping the good seed in the bowl. This only works if the seed coat is completely removed though, because any seed coat still clinging to the seed will make it more buoyant and pull the seed into the current of any water that is poured out.


There you go. Cucamelon seed. You can probably harvest 1 pound for every 75-100 pounds of fruit. And it probably takes over 5 hours to process an ounce of seed. Having harvested 2 pounds of seed, my wife made me promise not to grow another cucamelon out to seed the next year. Given the amount of work required, unless there was a dire imperative to do so, I will probably never process that many cucamelons ever again, but when I do, the following video will likely help.
No comments:
Post a Comment
Dear Gardening Friends,
I look forward to learning more about gardening with you. Your comments help me recognize that gardening is a life-long journey.
To advertisers: Note that this blog is concerned with gardening and gardening techniques. Please do not attempt to advertise here by leaving a comment. Depending upon how egregious the comment is, it may be deleted.