Monday, August 11, 2014

Getting Cucurbits off to a Good Start

Some Pre-sprouted Cucurbit Seed.
Because a seedling requires photosynthesis to grow into a thriving plant, the longer a seedling grows without sunlight the more it uses up its energy reserves in an attempt to expose its leaves to sunlight. The seedling that can pull its leaves from the seed coat quickly will begin to process sunlight earlier so it can grow strong and large before weeds, predators, and temperatures become unfavorable. Effective gardeners provide an optimal environment for each plant to grow so that the plant, in turn, will produce leaves, flowers and fruit much earlier than it would do in nature.


A cucurbit seed with roots (left) and primary leaves (right)


Cucurbitaceae  or Cucurbit seed, including squash, cucumbers, melons and their relatives tend to emerge from the seed coat in a uniform fashion with the root emerging before the primary leaves. As the primary leaves develop, they fill out until they can finally break free of the seed coat. Depending on the seed quality and the environment provided, cucurbit seedlings can require less than 1 day or over 2 weeks to emerge. Although seed quality is not a factor that most gardeners have total control of, each gardener possesses a large portion of control over a seedling’s initial environment.


In a previous post I outlined some tips for exposing cucurbit seeds to an environment in which they will sprout. Once a seedling is almost finished sprouting and its primary leaves begin to push off their seed coat, a gardener can ensure that the seedling sprouts earlier by how they position the seedling in the soil. Although various gardeners may find different methods for getting their cucurbits off to a good start I wish to show one method that I’ll call “seedling positioning” that I believe enables seedlings to quickly expose their primary leaves to sunlight.

 
1. First, you presprout the cucurbits. If you are unfamiliar with presprouting cucurbit seeds there is a little guide to the process at the bottom of the page at Cucumbershop.com.


2. Then you make sure the soil you wish to plant in has been watered deeply, then left to dry until the soil is workable (not soaking).


Illustration of initial soil, with broken line representing ground level.
 

3. Then, you dig one small trench.


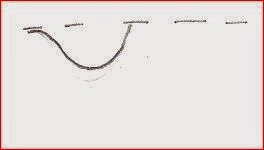
 4. Then another next to it.


5. Compact the dirt in between each trench to make a bump or island between the two holes that can support the middle of the cucurbit seed.


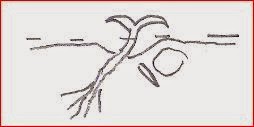
6. Then place the cucurbit seed with the root in the soil at one side and the primary leaves and seed coat on the other side.
 

Drawing of seed placement or positioning


Photograph of Seed Placement (or positioning)


7. Fill in the root portion of the soil to the soil line above the bump, leaving the middle of the seedling exposed.


8. Fill in the area above the primary leaves and seed coat with soil to the soil line, compacting the soil or leaving a small rock above the seed coat. By weighing down the seed coat the primary leaves will be able to pull out of the seed coat without taking the seed coat with it.
 
 
Burying all but the midsection of the seedling.


Note: 7 and 8 Can be interchanged. I actually prefer to fill in the seed coat first to hold the seedling in place.


Putting Dirt on the Seed Coat First


9. Leave the middle of the seed exposed or gently brush around where you last saw it until it is exposed.
 
 
Adding dirt over the roots (Palo Verde branch marking exposed portion of seedling).

 
10. Keep from directly watering on the seedling (you can water near the seedling) until the seedling has sprouted.


With the seedling correctly placed in the soil it can sprout quickly.


This time red arrows denote where the seeds are beginning to spout.


In 1 day the sprouted seedlings have emerged because of their placement in the soil.


Although I have not attempted a side-by-side trail of using vs. not using my seedling positioning technique I have noticed that positioning the seedlings so that they receive sun quickly enables them to grow quickly. I hope that other gardeners are able to find that positioning their seedlings helps them as much as it has helped me.


Happy Gardening!

Monday, July 21, 2014

Bringing Veggies back from the Garden Bed

This post is to follow up the terrible blight I had that destroyed the majority of the plants in my garden this summer.

What I felt I did right with this last disease outbreak: Each year I anticipate that something will get diseased and I plan for combating this in a variety of ways. By watering once every 4 to 5 days I reduce the amount of water that collects on the surface of the soil. Where there is no water interaction between the soil and the leaves of plants there tends to be much less disease. Every time I see dead or dying leaves on my tomato plants I pull and discard them in the trash. Instead of irrigating the plants by overhead watering, I water with a soaker hose. When diseased-looking beans were encountered, I pulled the majority of the leaves off the plant and discarded them in the trash.


Solarizing my Summer Garden

What I felt I did wrong: The local seed company I purchased my seed from is a nonprofit organization, and probably does no testing for disease. They most likely plant these beans in isolation and are not alarmed when plants wilt or die early. It is doubtful that this company treats seed with anti-bacterial agents or fungicides.

While I did pull diseased leaves from bean plants I did not ensure that the dead leaves that had fallen were discarded quickly enough.


Trying all sorts of things to get rid of the blight


How I reacted: Ripping out the majority of a garden is probably the best long term way to deal with rapidly-spreading disease. After pulling the plants, I added some fish meal to the soil, soaked the area by watering for hours before laying down a sheet of 5 mil plastic over the affected area of the garden. By watering and covering the affected area I am essentially “pasteurizing” the soil with a method called Solarization. This method kills both good and bad bacteria in the soil and requires weeks of furloughing the soil.


Another view of my summer garden while solarizing

Future Plans: Because the Rattlesnake pole beans I bought were very heat resistant and tasty I believe I will give this variety another try. However, next time I will be purchasing seed from out of state and putting them in a corner of my garden that is far from my tomato and cucumber plants.


Saving the diseased Rattlesnake beans to give back to the seed supplier

Though a spray application of diluted EM-1 was able to save the majority of my sweet potato plants (and reverse some of the effects of the blight) much like I had experienced before, EM-1 had less of an effect on the rest of my plants. I began a batch of activated EM-1 in an insulated very warm place and plan on applying this in water to my garden immediately after solarizing the garden. The philosophy behind this is similar to taking a probiotic (such as acidophilus and other healthy bacteria) shortly after taking an antibiotic intended to relieve a bad infection.


Unripe tomatoes in a bucket


A Legend or Celebrity Tomato


Some thoughts about treating bacterial diseases in the garden: Though there are many anti-fungal sprays on the market (such as those which contain potassium bicarbonate) antifungal does not always mean antibacterial. While it is possible to treat the leaves of some plants with an anti-bacterial spray, such as highly diluted rubbing alcohol, this is only a short-term solution to a larger problem. Just as a patient would be unwise to take only antibiotics every time he had a stomach ache, treating garden diseases with mainly anti-bacterial agents is, in the long run, bound to backfire - because some form of bacteria is always present in healthy soil. Introducing healthy bacteria into the soil on a regular basis is probably a more effective means of controlling disease.


Delicious Slices of Tomato

Friday, July 4, 2014

The Beans that Killed my Summer Garden

The pretty color of the Rattlesnake Pole Bean
For years I have been looking for a Phaseolus vulgaris pole bean variety that does well in our summer environment. Many other bean varieties do incredibly well in the Tucson Heat, such as the Chinese Long Bean (Vigna unguiculata subsp. sesquipedalis) the Tepary bean (Phaseolus acutifolius) and the Purple Hyacinth Bean (Dolichos lablab L.). Unfortunately, the Chinese Long Bean and Purple Hyacinth bean take a lot of effort to prepare while the Tepary bean is a natural carrier of bean mosaic virus - a disease I do not need to expose my garden to. The Phaseolus vulgaris or common bean tastes good for my family no matter how we prepare it (baking, boiling, stir-frying, steaming, eating raw).


Rattlesnake Bean Flowers


Having heard that Rattlesnake pole bean grows quite well in Tucson and knowing it to be a a Phaseolus vulgaris variety I obtained this variety from a local seed source this last winter.


Rattlesnake Pole Beans are quite productive


Top left leaves showing the first Signs of Diseased Bean Leaves


Without considering the potential consequences of planting a “native grown” variety in my garden, I planted out all the seeds in the packet. The purpose of a pole bean variety in my garden is to provide west-side shade for my tomato plants. This requires that the beans that I plant be completely disease-free, as any disease such as mosaic or leaf curl can spread like wildfire among some of the most virulent tomato plants. Out of the 50 plants Rattlesnake bean plants that popped up about 5-8 had leaves that looked wrinkled and deformed. These were immediately pulled from the garden and discarded. As the remainder of the plants grew, I noticed that many of the lower leaves died off. Though the premature leaf death of lower leaves is very similar to the Tepary bean the yellow leaves with brownish-gray spots was not.


Rattlesnake Beans Spreading Blight to Tomato leaves


Rattlesnake Beans (dead leaves) next to dying tomato leaves


Another look at the Rattlesnake Pole Beans next to Tomatoes


By the time I noticed the yellowing leaves and brownish-gray spots on my tomato plants it was too late. A bacterial blight spread like wildfire directly from the Rattlesnake beans to my Tomatoes and Purple Burgandy Bush Beans (also Phaseolus vulgaris) then to my cucumber-melons. Normally, it can be difficult to trace the direct cause of a garden disease. However, in this case there was a direct correlation between where these beans were growing and where the disease spread to other plants. Every day I went outside to pull branches, leaves, and plants from my garden. 


The characteristic circles and yellowing associated with Tomato Blight


Leaves of Tomato Plant experiencing Blight


Tomato Blight leaf remains exhibit wilted yellow/grayish leaves


When the disease finally began to spread to my sweet potatoes I knew that this was truly a bacterial blight and that the only plants I had a chance of saving were my sweet potatoes and Sunchokes. 


Blight effecting Sweet Potato Leaves


Once I was certain I had ascertained the problem I spent the entire next week measuring my progress not by how fast my garden plants grew, but by how fast I could tear my garden out.


After pulling Blighted Leaves


Ripening Tomatoes Under Shade cloth before pulling out the stems.

Friday, June 20, 2014

Texas Bunching Onion Harvest


As you can probably tell from my lack of posts recently, June is a difficult month for gardening in Tucson - though I do have some good news. The onions that cannot be killed – a.k.a. “Texas Bunching Onions” did really well in my garden this year. True to my experience so far here in Tucson, the vegetables that require the most work to process always produce the most. 

My children helped to harvest the onions. (=

These onions did great in my little winter garden, though they always produce small bulbs. If anyone can help me to find a scallion or bunching onion that produces fewer bulbs per bunch (and larger ones) I would really appreciate it.


Texas Bunching Onions with most of the stem removed.


It is not that I do not like onions – it is processing the small onions that can sometimes be painfully cumbersome. After selecting the largest of these bunching onions for summer storage I decided to place the remainder of the bulbs inside my barbeque to dry. Several days after leaving the bulbs in a black barbeque next to a south-facing wall in the 100+ Fahrenheit heat, I ventured outside to check on them only to discover they have defiantly resisted drying or even slightly discoloring. I knew that this variety makes a good storage onion but I never knew they were so incredibly resistant to the heat. If only I could find a larger bunching onion that could do this!


1 week of attempting to dry the Texas Bunching Onions.

 
Processing these onions by drying may be an exercise in futility.

Tuesday, May 27, 2014

Lettuce Worth Saving

Living in a southern climate means an uncertain winter. Sometimes the winter is very cool while other times we experience 80-90 degree Fahrenheit days for a week or two at a time. Often, when there is a warm period during the winter the lettuce goes bitter. Even some more bitter-resistant kinds of lettuce that I have grown have gone bitter – until this year.


My Jerico Lettuce sprouted up quickly (Source: SESE)


Though Jerico Lettuce is not the most beautiful romaine lettuce it is the most bitter-free variety I have ever experienced. While some lettuce will go bitter in the middle of the winter, Jerico continued to produce healthy slightly-sweet leaves until they finally bolted in May.


Some uniformly green leaves of Jerico Lettuce


Saving lettuce is a pretty simple task. All a gardener needs to do is leave the lettuce alone and let the pollinators do their job. I chose to select my seed by saving only the largest lettuce heads that bolted last. Late bolting is essential to growing in a warm climate and if the early-bolting plants are not culled then the gardener will not improve the variety.


Lettuce beginning to bolt


Lettuce Flowers are so pretty


I am always experimenting with new techniques in harvesting and saving seed. This year I tried both cutting individual lettuce heads by hand (a very laborious process) as well as experimented with waiting until the majority of the seed had dried before cutting off each stalk. Cutting off individual heads by hand is probably only worthwhile if you have strong winds or the seed heads are going to be disturbed by something going through the garden. Otherwise it is much easier to wait until the majority of the seeds heads have started producing seeds and lop the whole stalk off at one time.


One method of harvesting lettuce is to harvest one head at a time.


Lettuce Heads beginning to dry.


I also harvest lettuce by cutting each stalk when most have gone to seed.


The rest dry out and go to seed shortly thereafter


Once I have gathered the seed heads and let them dry I rub them with my fingers to separate the individual seeds from the seed heads and white fuzz. Then I winnow them using either the wind (if there is a consistent wind outside) or a fan (if the wind is unpredictable that day).


Lettuce heads after drying and being rubbed to separate the seeds from the heads.


Winnowing the lettuce seed


That is about all that is required to save lettuce seed. I would highly recommend Jerico lettuce to anyone who wants to extend their lettuce crop beyond the usual season. It is not a beautiful variety, by any means, but it produces a reliable harvest long after other lettuce varieties have turned bitter.


Lettuce seed is easy and fun to harvest. (=