Tuesday, November 26, 2013

Gardening for Geeks by Christy Wilhelmi


Occasionally I will encounter a gardening book that will present completely new or detailed information that is not found in many other places. But for the most part, when I pick up a gardening book, I often find the book catalogues the ideas presented by others in various books and publications rather than introduce a new concept. Although Gardening for Geeks by Christy Wilhelmi fits much more into the second category than the first, it is still worth a read. Much of what I read in this book, although compiled from other works, included some good summaries of already existing reading material.
 
It was definitely worth looking through this book.
 
Even though many of the gardening methods presented in this book, including square-foot gardening, are really good sometimes I wonder how much they get what happens in my region, such as the high potential for insects and disease to completely wipe out a bed of lettuce or tomato plants. It is not that writers of gardening publications are purposefully misguiding readers, but when you live in an extreme climate it can be easy to feel that garden book authors just don’t get it. That being said, some of the biointensive methods, such as the French Intensive, hexigonal planting  and the 60:30:10 method really interested me. Even without knowing much about the French intensive method before digging my 24 inch deep mostly compost beds, it seems as if I am doing many of the same things that the French intensive method promotes.


The most helpful bit of information I learned about was from a book called How to Grow More Vegetables by John Jeavons. According to Jeavons (as cited by Wilhelmi) a gardener can make their garden much more sustainable if they grow utilizing a 60:30:10 formula for sustainability. The premise of this sustainability formula is to have the land produce food for both the gardener and the garden. Apparently it should be able to produce enough food for one person by utilizing only 4,000 square feet of garden space. The way this formula works is to commit 60% of garden space to crops that return large amounts of carbon and nitrogen back into the soil such as grains, fava beans and cover crops to create mostly biomass to be composted and some food. At the same time, 30% of the garden should be designated for high-calorie crops, such as potatoes, sweet potatoes, parsnips and Jerusalem Artichokes. Lastly, Jeavons says that 10% of the garden space/time can be devoted to tomatoes, peppers, squash, lettuce, carrots, etc.
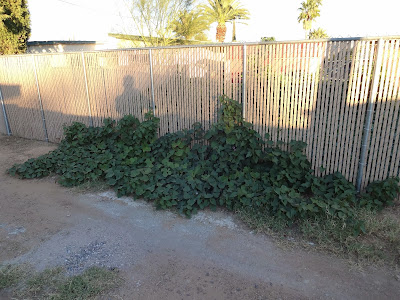
 
My high-calorie sweet potato crop knows no bounds as it grows into the alley. (=

While I have slowly moved towards a method like John Jeavons’ biointensive method I never thought that it could be related to biomass. Many of the 60 and 30% crops deserve more time and room in the garden because they are much less work for the organic gardener in relation to pests and disease than because they “environmentally friendly”. Though most intensive gardeners may scoff at the idea of dedicating so much of their plots to corn and potatoes, perhaps they will decide to raise more grain and high-calorie crops when times get tough and they require a garden that is more self-sufficient.
 

Thursday, November 7, 2013

Admiring the Mighty Luffa

During the time in which I am waiting for my winter garden to grow and my summer garden to freeze I occasionally visit other gardener's plots to observe what they are growing. Recently, while walking around the Tucson Organic Garden (TOG) plot located near central Tucson I noticed that most of the summer plants were gone and small winter beds were still in their infancy. Amidst the younger plants was a plot that seemed to still be growing a summer crop. In this plot there was one plant which displayed interesting leaves, which from the distance resembled grape vines, that immediately caught my attention. This mighty plant was none other than the luffa gourd.


The Mighty Luffa Gourd


The majority of the plants that grow like weeds here in Tucson either produce thorns or are generally unpalatable. This is definitely one good reason to initially be hesitant of this plant’s taste and texture. Besides, this plant is used for making natural sponges just as often as it is used for making food.


The Luffa Gourd plant looks a little like Grapevines
 
 
It seems that the bees really enjoy the luffa flowers

Though I have heard that the luffa fruit is very light and spongy in texture and is similar to squash in taste, I am currently of the mindset to not attempt sauté up a luffa for dinner. Knowing that my children are reluctant to try eggplant, perhaps the best approach is to ask someone with experience in growing and cooking this vegetable up to invite me over for a sample before I commit to growing this vegetable.
 
An immature Luffa
 

Though my instincts tell me that this plant may require lot of preparation in cooking for a decent taste to be achieved, I am awed by the beautiful appearance of the leaves and fruit that this vegetable produces.
 
The Luffa Gourd flowers are very pretty

Thursday, October 31, 2013

A Tucson Planting Guide for the Organic Seed Saver


Years ago, after many failed attempts to understand gardening in Tucson I made this little guide for myself, which consists of 3 charts. Please note that I am not saying that this is the "definitive" guide to growing plants in Tucson. Rather, this is an attempt to better understand how to plan out my gardening.
 
With the first chart I was attempting, on my part, to understand when to plant, how long I could expect plants to take to germinate and grow. First, it lists some "general" planting dates. But more importantly it then lists the optimal soil germination temperature (in parenthesis). Knowing the soil temperature allows the gardener to note the current conditions, rather than relying on a calendar that may not be as accurate. 
 
The next set of numbers underlined in the third column lists the days until you can expect to notice seedlings popping out of the ground. Lastly, the chart tells the amount of time you can expect until you might see a harvest. Plants that are grown over the winter months under less light will take longer to grow.


Contained in the second chart (on the upper right) is a basic guide to NPK ratios of various amendments. All amendments will vary – so I take this with a grain of salt.
 
Finally, the last chart of this guide (on the lower right) concerns seed viability. Why, you may ask, might this information come in handy? Any gardener wishing to have some hope of self-sufficiency recognizes that a major component to being independent in a time of need is to have control of his seeds. Knowing how many years a gardener can keep seeds in a cool dry place enables the gardener to plan the frequency by which each vegetable variety must be grown.
 
On a side note - If people would focus less on complaining about big agricultural companies such as Monsanto and more on saving seeds we would not have to worry about the negative side affects that such large companies could create. A gardener who possesses quality water and soil and employs appropriate gardening practices can determine her skill at saving seeds by the quality of the vegetables harvested from her home-saved seeds.

Friday, October 18, 2013

Bringing Back the Winter Garden

Little things in life can sometimes make a huge difference for my overall wellbeing. When I fallowed my winter garden last year, to take care of the needs of my family, I never imagined that it would affect me psychologically. When times are tough and things everything seems to be going wrong, going out and seeing the growth of the plants is a real morale booster. After leaving my winter garden to fallow last year this small strip of sun baked soil is making a comeback.


Little Viroflay Spinach Seedlings Sprouting up

 
Recently, the school district I live in had a fall break which enabled me to have some time. This break, along with my wife lovingly taking the kids for a get-away gave me some time to get my winter garden set up. However, getting my garden set up turned out to be a little more complex than I had initially anticipated. The first in planting in my winter garden came with accessing that portion of the yard. The sweet potato vines had grown into the winter garden over the summer and I didn’t really want to cut them down. After talking with one of my daughters about the issue we decided that some unused water barrels would do just fine in lifting up the vines enough to clear out the area in the winter garden.
 
 
Rather than pruning the sweet potatoes I lifted them up with water barrels
 
 
My next dilemma came in working with the soil. The soil was incredibly airy and soft. In preparing my soil I leveled, then tamped down the soil to ensure that any water put into the ground would not run off onto the nearby Bermuda grass. Though trampling and tamping down regular dirt can be very detrimental to the structure of clay soils, it is very beneficial when working with an airy organic material-based soil. If the soil is too airy, then it can quickly evaporate leaving seeds to dry out. My last major undertaking in preparing my garden was the complex task of hooking an elaborate system of regular hoses, soaker hoses and Y-joints up to my garden timer. After getting all of that set up I finally was able to plant!
 
 
Some Jerico Lettuce seedlings

 
Though I was very concerned about plants sprouting I discovered, soon after planting that I saw small spinach leaves coming up. Spinach usually requires a cooler temperature – so this was good news for the rest of my seedlings. I then noticed the Jericho lettuce, with its delicate green leaves, seemingly sprouting up overnight. The beets and carrots have been coming up too – but the real celebration came when my first artichoke seed sprouted. For the last 3 years I had been waiting and trying to grow artichokes and had repeatedly failed by planting seed from an established seed company that turned out to be completely unviable. A more recent failure with growing artichokes from seed came when I had sprouted some seed in early September only to have the seedlings wilt during a hot September afternoon as a result of temporary problems with my watering system.


Peas, Onions and Carrots sprouting up
 
 
What I am trying to relate at this time is that I am looking forward to this winter's garden. I hope to let my children pick peas from their garden and have me experiment with McGregor’s beets in my garden. It is my belief that when life becomes complex and overwhelming there is wonder in taking a minute to go outside and watch the plants in my garden grow and flourish.


An Artichoke Sprout at last.


Tuesday, October 1, 2013

Mail Order Sweet Potato Slips and EM-1

Last May I received a long-awaited package from a company headquartered in the East. The package contained two small bundles of very small-looking sweet potato slips.


Amazingly, the slips came out of a dented package out unharmed!


In the past, I had always produced sweet potato slips myself from sweet potatoes, and knowing that the daytime temperatures were already topping above 95 degrees Fahrenheit I thought it wise to start some of my plants in pots or vases indoors before planting them out in the garden. This was a type of experiment to see what method of planting would work best. The three different methods I tried were slip to garden, slip to pot to garden, and slip to vase to garden.

How my package arrived in the mail.

The package got a little dented. I'm grateful the slips made it.

General Sweet Potato Background: Sweet potatoes like a lot of light. By a lot of light I mean full sun in very hot, sunny places. Established plants do not require shade and are able to endure brutally hot environments. What sweet potatoes do have difficulty with is a lack of light. Any kind of environment in which plants are not receiving direct sun will make the plants dither or at least grow slowly.

The plants in the pots did not fare as well as those put directly in the garden

Though I put my indoor plants directly under windows, they had difficulty growing very well because they did not receive enough full sun. Most of the slips that I put in pots had difficulty establishing themselves indoors and did worse than those put out in the garden. Slips I put in vases did exhibit more root growth, which was helpful when it came to transplanting them in the garden. The constant sterile water supply was helpful, though a lack of direct sunlight was not. Slips that were put directly in the garden exhibited significant wilting over the first 10 days but did better after about 14 days. Filtered shading from a shade cloth helped minimize wilting until the plants could establish themselves well.


Initial placement of slip in vase.


The slip grew more roots but plant suffers from a lack of light

Recommendations: Based on my experience with mail order sweet potatoes I would recommend that the gardener either allow sweet potato slips to establish themselves in a vase that receives an abundance of direct sun or put the slips in the garden with filtered shade, such as shadecloth, until the plants become established. As filtered sun could decrease plant growth, and possibly yield, I would think that any shadecloth or filtered sun provides only a temporary benefit to the sweet potato slips as they are becoming established.


Shading Slips helps them become established without extreme wilting


One additional thought: Previously I had posted about a microbial product that is supposed to increase plant growth in the garden. The name of the Product is EM-1 and it is produced by Teraganix. The initial application of EM-1 seemed to have no impact on my garden. After two weeks of application no signs of increased growth or plant vigor were noticed. However, after 6 weeks of the initial application the sweet potato slips that were growing exhibited a dramatic increase in growth. The increase in plant growth was not imagined, but is very real. Though previous sweet potato growth did not move several feet past my garden, my current sweet potato vines have grown at least 10 feet past the confines of my garden. Neighbors are probably wondering why I have what looks like ivy growing out into my alley. My experience with EM-1 has taught me that it is an incredibly effective inoculant in growing sweet potatoes. I will be sure to continue to use this product for this purpose, in the future!


My Sweet Potato vines in Early August - The bottom half are from the slips!