Thursday, March 22, 2012

Beneficial Insects of my Garden

As a kid I was fascinated with bugs (to say the least) and I have probably, from egg to egg, raised ladybugs, Anise Swallowtail butterflies, Painted Lady Butterflies, and Praying Mantises with the last being the most difficult. Most insect pests have predators - so it can greatly help to know each kind of beneficial insect (those that eat your insect pests) that lives in your area and how you can use them to minimize your crop damage and work. I would much rather have beneficial insects do the work of eliminating pests for me.


Grey Aphids can do some damage to the top of plants


 Aphidius colemani parasitic wasps finding aphids on the leaf 

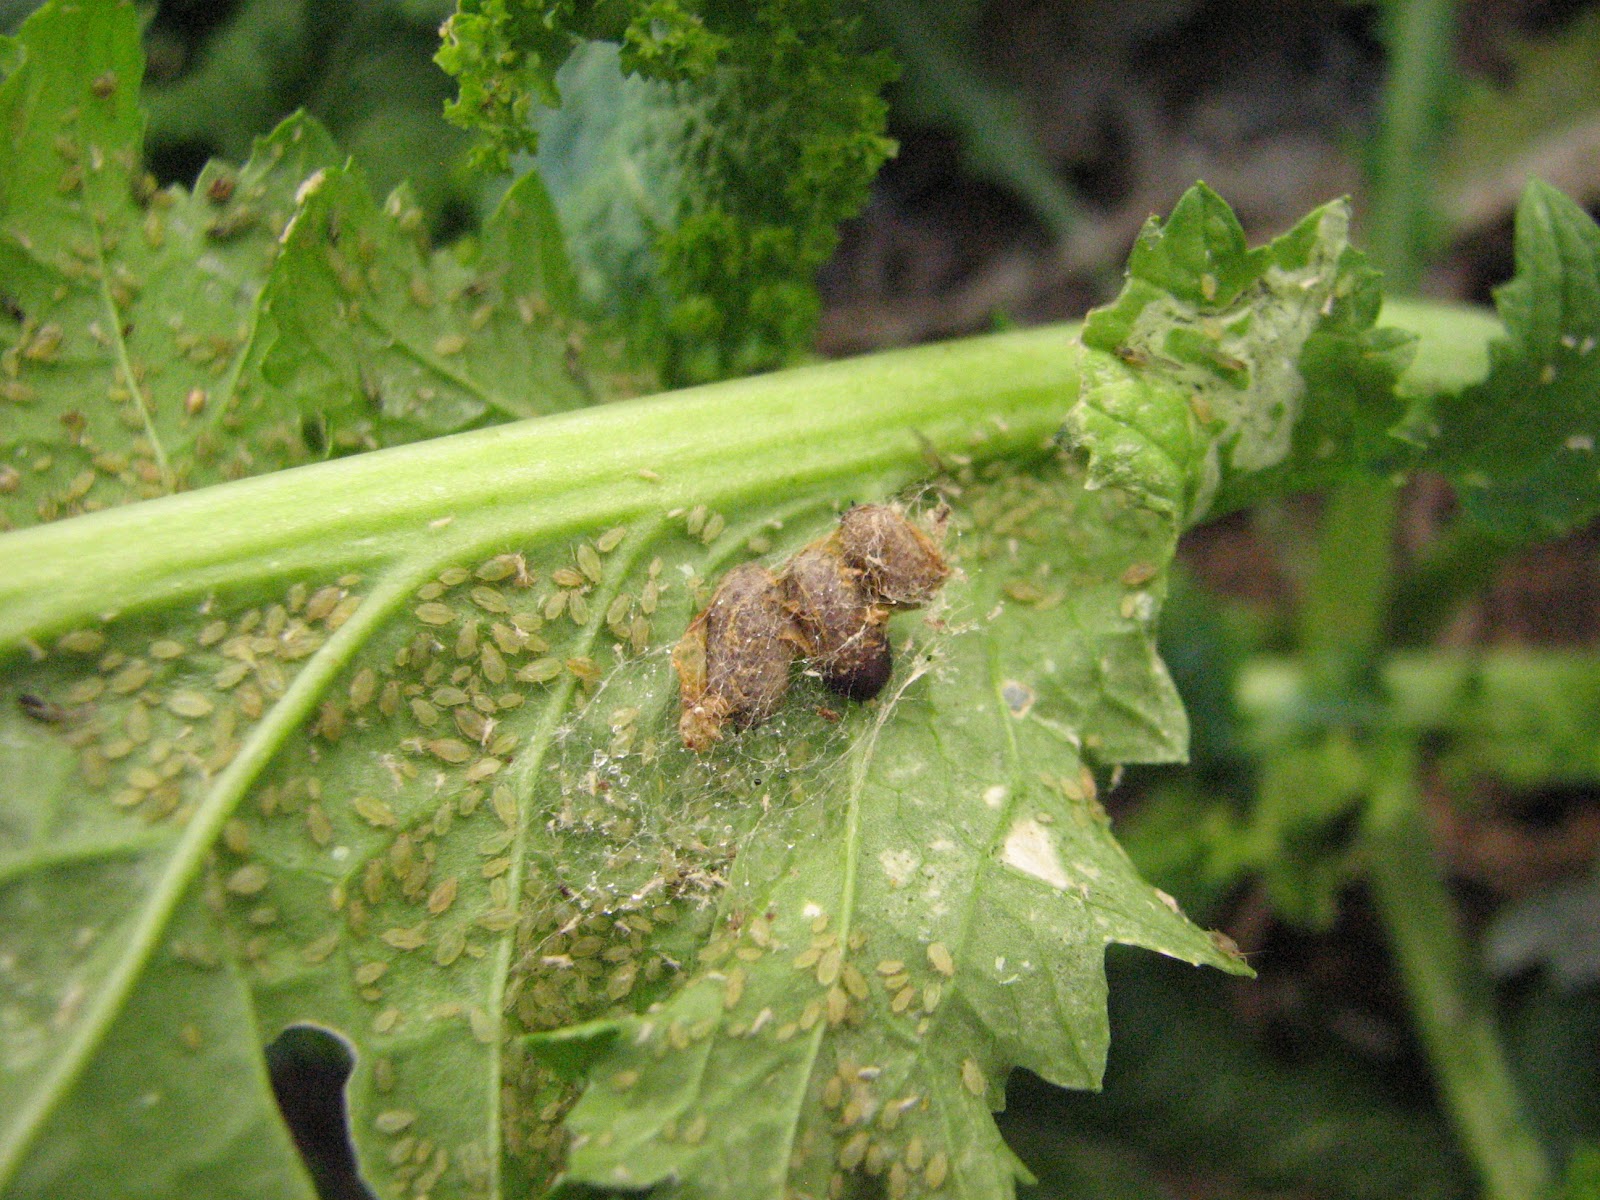
There are some insect pests whose presence in my garden must be addressed immediately, because of the extent of damage a few can cause and because they have no native predators to bring their population down to numbers that are acceptable to me. These include cucumber beetles, tomato hornworms, squash vine borers, and cutworms. Many of the rest of my pests I rely on beneficial insects to take care of. The most common pest in my garden is aphids. With wings that enable them to fly from one location to another, with ants working hard to protect them (ants harvest nectar from many kinds of aphids), and with the ability to double their population in a matter of days aphids can do a lot of damage to a garden. Their method of attack is sucking juice from the plant, which weakens the plant and can result in leaf curl of both old and new growth. Aphids have many enemies including parasitic wasps, the fuzzy Scymnus beetle larvae, lacewing nymphs, ladybug nymphs and various caterpillars and nymphs of other kinds.


Aphidius colemani parasitic wasp hatching from prey.


Hoverfly Larvae eat aphids.

Scymnus beetle larvae enjoy eating aphids too

Lacewing Egg on a leaf.


Adult Green Lacewing
My all time favorite of these is the Aphidius colemani parasitic wasp followed by the lacewing. The female A. colemani wasp flies from leaf to leaf, poking her egg laying tube into various aphids to lay eggs in them as she desires. The aphids eventually turn yellow then golden as the new wasp grows within the aphid, then eats it from the inside out. Then the wasp cuts an opening out of the aphid shell and starts the process all over again. Why I love the A. colemani wasp so much is that it can really take the Tucson heat and the ants and aphids just cannot compete with it. I really enjoy lacewings as well. They stay in Tucson throughout the year and are a real help whenever I need a bug to take care of my aphids.

The other beneficial insects I have noted appear in small numbers throughout the year, depending upon how much heat or cold they can tolerate. They complement the A colemani and lacewings but seem to only come in as backup when aphid populations get really high.


Ladybug Larvae feasting on aphids


Fast ladybugs are difficult to catch on camera


Cabbage Looper caterpillar...
 
...plus caterpillar Parasitic Wasp...
  
...equals new home for wasps!

The only other beneficial insect of note for the garden is the praying mantis, which does well in established gardens. Mantises tend to thrive in long-standing gardens with multiple stories of foliage. This is because they feed on different insects throughout their life cycle. Though they can live in many environments, they prefer eating flying insects and residing on flowering plants that attract insects half the length of their arm. Got all that? Mantises can be difficult to keep in an area, unless you have enough area to support their prey and to keep them safe from larger predators. Many kinds of mantises inhabit Arizona (including Tucson), but the most common variety I find in Tucson is the Mediterranean Mantis, or Iris oratoria.

Mediterranean Mantis on my neat desk. (=
 
So how do I attract beneficial insects? The first way I do this is to give them a healthy food source – which means I let the pests thrive. I usually try to start a population of pests and predators early in the spring so that I can enjoy the benefits of beneficial insects all summer and fall. And what if no beneficial insects thrive in my area? I could purchase some varieties from companies that could do well in my climate or I could kill bugs by hand. As for me, I prefer the method with the least work – let the beneficials do the work.


Wednesday, March 21, 2012

The Enigma of Organic Pest Control

One very effective way to eliminate a pest is to eliminate its food. If you starve any creature to death long enough it shouldn’t come back – right? That is what many people in Tucson choose to do if they receive repeated assaults from Squash Vine Borers. That does not necessarily take care of the pests though, as the pest may come back the next season you plant a crop. Another option is to grow indoors. However, the cost is too great for most gardeners to pay for the lighting and fancy equipment needed to grow crops in a controlled environment such as a greenhouse, nor do most gardeners want the possible consequences that could occur if whiteflies or some other insect pest happened to sneak into a controlled growing area. Instead, most gardeners prefer to work in rich soil and do what they can to keep bugs from taking the majority of their veggies.


A good read for Southwestern Gardeners
In order to control the bug problem in my garden I practice a form of Integrated Pest Management, or IPM for short, in order to maintain the health of my vegetable garden. In Desert Gardening for Beginners by Cromell, the author devotes an entire chapter (7 pages) to managing insects. She describes the 6 steps of Integrated Pest Management as follows:

1. Identify the pest
2. Monitor the pest’s population levels.
3. Decide how much damage is acceptable to you (for the plant’s health and/or aesthetics).
4. Consider all options, including no control at all.
5. Keep accurate records
6. Evaluate results and modify the program as needed.

Although I will not expound too much on these points, the author does, and I would highly suggest a read of this little book for those seeking to grow veggies in the Southwest. I am very good at each of these steps except for step 5. The only time I wish I had kept better records for pest control would be to determine when the beginning and end of the Squash Vine Borer season is. Integrated Pest Management works for me because, even though I tend to notice a lot, I am a very lazy gardener. I do not want to spray my crops nor deal with the effects of a chemical spray. Instead I could do some of the following:

- Choose to use some low-impact techniques, including the use of beneficial insects.
- I could spray my garden with some form of home-made concoction (such as with garlic or with hot pepper).
- I could spray with the area with BT bacteria.
- I could dust all affected plants with Dichotomous earth (which kills insects that walk on it).
- Practice some form of crop rotation to decrese the reoccurance of a yearly pest infestation.
- Kill the plants and let the ground fallow for a while.

I have tried making a homemade spray before and it works a little. However, most concoctions only work for while and do not get at the heart of the problem. I have used Dichotomous earth in the past, and I feel it works well for cutworms, but I resist using it in any place frequented by lizards or beneficial bugs. For the most part I choose to fallow one of my two gardens and use beneficial insects, both of which are free techniques. This helps me to do as little maintainence on my pests as possible. Though I do hope to grow cover crops in my fallowed garden in the future, for now my fallowed area seconds as a compost pile.


Dichotomous Earth can be bought from Hardware Stores

Tuesday, March 13, 2012

Processing Tomato Seeds

With tomato seed offered by catalogues becoming so expensive it is no wonder that many gardeners are choosing to save seed for themselves. While my early attempts at saving tomato seeds left me with pretty unworkable cakes of seedy pulp stuff I now save tomato seeds very easily through the process of fermenting. All that is required is a few simple tools and a little bit of patience.

First things first – find your favorite open-pollinated (non-hybrid) or Heirloom tomato plant and pick yourself some very ripe or over-ripe tomatoes. Tomato seed is often at its best when the fruit is over-ripe though good seed can often be extracted from barely ripe fruit.


Selecting Hahms Gelbe Tomatoes for Seed Processing
 
Next, you cut the tomato and squeeze out the pulp containing the seeds. When you are done squeezing out the tomatoes, you can add ½ the amount of water to seedy pulp, if desired. This may make seed processing easier for later. You can eat the outside layer of processed tomatoes, if you want. My kids sometimes stand next to where I am processing seeds and eat the outside layer when I am done squeezing out the seeds. Then put a lid on the container, label the container (if you are doing more then one type of seed) and wait.


Squeezing Tomatoes for Seed Processing
 
What are you waiting for? You are waiting 1-5 days until the container produces a rotting odor and develops a bit of fuzz or a floating mat of mold. Yum! You may now be wondering why anyone would even do this. The reason why fermentation is so helpful in processing tomato seed is that fermentation breaks down the bubbles of slimy pulp covering the tomato seeds (which helps with seed storage and use) and kills pathogens that could lead to disease in the next generation of tomato plants.


A layer of mold has now formed on top of pulp mixture
 
Next, remove the floating mat of mold and pour the seedy slimy mixture into some form of sieve or screen, saving the slimy pulp for now. You might need the pulpy mixture later if the mixture didn’t ferment completely. A relative gave me my screen thingy. She said she probably obtained it from a dollar store or Walgreens.


Rinsing out Tomato Seeds
 
Wash out the seeds very well. If you hold a wet seed in your hand you should feel no pulp, but instead notice a very small layer of fuzz around the seed. This means you can now throw away that nasty slimy mixture. If the seeds still have a slimy coat that cannot be removed you will need to put the pulpy mixture and seeds back into the fermenting container and wait to rinse again later. If the seeds do not ferment long enough then they keep their slimy coats while if they ferment too long they will turn dark and may not sprout when planted.


Rinsed out Tomato Seeds in my Sieve thingy
 
The next step should be straightforward. Put the seeds on a paper plate or something else that you can label and put in a dry undisturbed place. I have to say undisturbed because I have small children – so my undisturbed place happens to be above our cupboards. After a day of drying, I stir my seeds to see if they are dry all the way. Then write the name of the variety and the year on a bag with permanent marker, along with anything else I might want to know about the seeds and put the seeds into storage.


Hahms Gelbe seeds ready to dry

Some finished seed - Notice the fine hairs on the seeds

I hope that this little tutorial is helpful. In relation to seed saving, tomato plants are not very susceptible to inbreeding depression, meaning that the seed from just one healthy plant can produce a large number of high quality seeds to grow future generations of tomato plants. The ease of saving tomato seed is probably why so many tomato seed companies have sprouted up recently (no pun intended).

Upside-Down Tomato Planters


Occasionally, when I drive through Tucson I see an upside-down tomato planter with something sticking out of the bottom. The majority of the time the things sticking out from the bottom is some form of vegetation that tried to survive our harsh climate and failed miserably. My neighbor's windchime pictured here reminds me of these dead tomato plants. It is not just another pretty decoration but is, in my mind, a memorial to all those enthusiastic tomato growers who fall prey to a computer generated image of a crop of tomatoes so bountiful that, if it were real, the weight of the tomatoes would pull the whole plant out by the roots!

So why do upside-down tomato planters not work in the desert? Should you be able to put your upside-down tomato planter in the clothes dryer you would find out. I call it the blow dryer affect. In mid-June the daytime temperatures in Tucson are well above 100°F (38°C) and the strong winds manage to wilt anything that does not have a well insulated or deep root system. Unless they are related to cacti, any plant in a small pot can die from either drying out from the wind, a lack of water, or radiant heat. Those gardeners with summer plants in pots may not realize that the sun cooks the pot every day. Even if a potted plant has water, the water will often become so hot that the roots become pasteurized. With all these factors, a tomato pot or bag exposed to more of the wind and the heat (by being hung up) will surely expire. This is definitely one of those cases where, if tomatoes were meant to grow upside down, we would be seeing them growing from the trees. So, where should upside-down tomato plants be grown? Somewhere in the north with mild cool summers and a whole lot of sun.

As an additional note: One gentleman has already tested upside-down planters and found that they do not work effectively while others have even been injured by these things. Additionally, a friend on mine told me her mother had mounted one on a tall awning that turned out not to support the weight of the pot. The pot pulled off some of the awning hit the side of the house, then smashed a glass table beneath causing a total of $1000 worth of damage. Not to scare anyone, but it would be wise to think before growing things upside-down.

 
Neighbor's Decaying Upside Down Tomato Planter

Organic Warfare

With the stress of Tucson’s heat, repeated attacks from Squash Vine Borers and growing from a bed of unfinished compost one of my Long of Naples vines mutated to become the ultimate organic weapon.


Processed food – meet the Female Squash Blossoms!


POW!