Pages

Monday, April 30, 2012

Starting Sweet Potatoes


Supplies to Start growing Sweet Potatoes Indoors
Unless you are dealing with the Okinawan purple sweet potato, most sweet potatoes are pretty easy to start. One very good step to starting sweet potatoes is to find a potato variety that grows in your area. Georgia Jet seems to be one of the most popular varieties as it can be grown throughout most of the United States.

I prefer to find a Farmer’s market or a local farmer who is able to provide me with potatoes from my climate. I find sweet potatoes do very well here in the southwest, though regular potatoes do not.

I purchased my “seed sweet potato” from a local Whole Foods market in a section where they stated that it was grown locally and they produced a good number of potatoes. I am assuming the variety is Georgia Jet, though I can’t be certain. Previous to growing out the local variety I grew out two varieties I had bought from the grocery store that were from another state. The out-of-state potaoto grew large but produced very few potatoes.

Sweet Potato Halves now in water for Growing

 To start sweet potatoes, you will need a location to keep the seed potatoes very warm (80-90 degrees F). I use a reptile heat mat with a rhetrostat to keep the temperature consistent. You can choose to sprout them suspended in a jar with toothpicks or you can choose to start them in some kind of pit filled with sand or some other substrate. The important thing is lots of moisture and warmth. I prefer to start mine inside to grow out small sweet potato plants or “slips” from the potato.

Beginning Root Formation on Sweet Potato

Why not just plant the whole potato in the ground? There is always a chance that the potatoes might rot underground, causing disease in the soil and which can be spread to your new sweet potato crop. In the sweet potato industry they will grow out new plants out of the potato in growing beds and harvest the young plants (called slips) from the soil when they grow large enough to continue growing without the mother tuber. These slips are then transported to the fields where they are transplanted and grow into the sweet potato crop. There is another method (that I outline in another post) to starting sweet potatoes in the garden that allows them to get started quickly as long as you are using known healthy sweet potato stock.

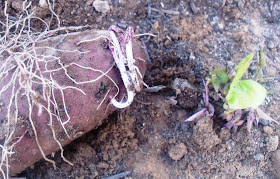
Sweet Potato Slip (plant) forming on mother potato.

Growing out Sweet Potato Slips: For my jar and toothpick method I cut the sweet potato in half and suspend 1/2 to 2/3 of the potato below the rim of the jar using toothpicks. Then I fill up the jar with water, put it in a warm place and make sure to change the water often. It can take 1-2 months to get sweet potato slips started so make sure to plan that much time in advance.

Full Grown Slip on Sweet Potato

Care: Compared to many other vegetable varieties sweet potatoes are relatively maintenance-free and do not require an excessive amount of fertilizer or pest control to grow strong healthy plants. They do perform better in areas where the dirt has at least had the large rocks sifted out. Once they have established themselves I just keep them well watered and occasionally make sure no large creature is chewing on the vines. Some bugs will chew at the vines but usually the vines grow faster than the bugs can reproduce.


Sweet Potato Slip


The Sweet Potato Slip now a Sweet Potato Plant in my Garden

Harvest: I usually harvest right after the first slight frost. Sweet potatoes tend to die at the slightest frost, which around here can often be in November or December. Though some use pitch forks to harvest their sweet potatoes, I choose to harvest by hand, following the roots from one tuber to another. Once I harvest my sweet potatoes I keep them moist and warm in my water heater closet to cure them. Curing the sweet potatoes allows them to store longer, which is essential I would like to plant sweet potato vines out again next summer.

An All Purple Sweet Potato - Slips available through SESE

Wednesday, April 25, 2012

Magic Garden Nursery

A year or two ago I was having a difficult time and wanted to relax taking a look at what vegetable varieties were available from a local nursery (who shall remain un-named). While browsing the seed rack with another customer I told him about a few vegetable varieties that had grown well for me. Upon hearing the conversation between the other customer and I, the manager/owner of the nursery angrily told me to leave and added that I was never welcome to come back. Having purchased garden supplies from the nursery before, I left confused and upset at how I was treated.

Within a few days I came to Magic Garden Nursery to find friendly people, who care about me just as much as they care about the plants they grow.

I love coming here.
The above true story is just one of many reasons why I patronize the Magic Garden Nursery. A few other reasons include some very knowledgeable staff, an inviting laid-back atmosphere and the fact that they carry a great selection of heirloom (and a few award-winning hybrid) vegetable plants that do well in my climate.

Just some of their vegetable starts

Pepper Starts

More Peppers

Some Squash
Though I remain pretty self-sufficient most of the time, occasionally I choose to splurge. Rather than growing from seed once or twice I year I buy a Celebrity Tomato plant, or a hard-to-find heirloom that is already half grown or some soil ammendments. I also enjoy browsing seed racks to find vegetable varieties that I have heard might do well in my climate.

The problem with Celebrity Tomato Plants in a small cage is large tomatoes

Celebrity Tomatoes don't like being confined (=

Tony Sarah, the manager, has teased me about how little I buy compared to how much I browse, but I don’t mind – because as long as they continue being kind to me I’ll keep spending my money there.


Ornamental Sweet Potatoes

Some Pretty Orange Flower

I'm no expert on flowers - here are some nice yellow ones

Floral Displays are always attractive

Magic Garden Nursery has a pretty fun website that reflects their approach to gardening  – that it should be fun and enjoyable. If you live in Tucson and have had a difficult time at any another nursery I highly advise you come down to Magic Garden.

Tuesday, April 17, 2012

Improving Chances of Gardening Success


Twisted Curly new Tomato Growth
Imagine that a new gardener in Tucson, AZ (USDA Zone 9a) buys some generic tomato seeds and plants all of them in mid-May. What happens? The few that grow quickly die because the odds of success are over 1,000 to 1. Will planting more seeds increase the gardener’s chances of success? Probably not much.

What will increase the gardener’s chances for success while decreasing his chance of failure is knowing and applying concepts about planting dates, climate conditions, soil conditions, what conditions help tomatoes grow best.

I recently had to pull out almost half of my tomato plants because of disease. I am hoping that, over the last few years I have improved my chances of success with growing tomatoes from odds of 1,000 to 1 to closer to 30 to 1. Meaning that I fail 30 times for every 1 time I succeed. Good thing most tomato seed packets contain over 30 seeds. My success rate is much higher with plants that grow well in Tucson’s climate.

Mottled and curled leaves from Disease.

Each time a gardener fails at something a more insightful learning is exposed.

Here are a few things I have learned through study or plain experience about a garden’s temperature and disease that have helped me.

Temperature:

- Radiant heat in winter is good. Radiant heat in the summer is bad. Walls, buildings, some trees, and plastic bottles can provide radiant heat.

- South facing slopes, walls or buildings in winter is optimal. East facing slopes or west side shade in the summer is optimal.

- Troughs or furrows in the garden keep plants cooler and wet in the summer while hills keep plants warmer and drier in the winter.

West Side Corn, Lowered Tomatoes while still needing radiant heat at night.

Disease:

More diseased tomato plants
 - Once a disease attacks, remove the whole plant immediately (roots & all). This will decrease the spread of disease and hasten the time when that vegetable variety may be grown there again.

- Composting diseased plant material spreads the disease. Don’t do it! Burn it or throw it away.

-Once disease hits do not plant the same plant in that soil for at least a year (or more depending upon extent of disease). Options to overcome this is to move next year’s planting location for that crop, growing other vegetable crops there, or using new soil that has never been used for growing that crop before.

- If you plant a disease-resistant variety in a diseased bed, it will most likely get the disease.
Disease can mangle a tomato plant

- Growing legumes next to other plants or before other plants helps to increase beneficial bacteria in the soil and may decrease the chances of disease (as a preventative measure). My best success with this has been to start the legumes a few weeks before introducing my main crop. As long as they are not competing for light, experience has taught me that growing a crop of beans near other plants has only benefited the nearby plant.

- Learn about each vegetable variety you plan to grow. Know its needs, its strengths, it weaknesses, and how to combat potential problems.

- It is good to occasionally take a break from higher maintenance crops so that you can appreciate your other plants.

-Do not treat disease as a bad thing. Learning about plant disease enables the gardener to adjust his gardening practices and increase his chances of future success.

Empty Spot where I pulled tomato plants out of the garden.


My chances of seeing my tomatoes live may be as good as 1 in 20
 
To anyone who lives in a climate where the odds are stacked against you – I feel for you. As you find out all you can about growing things you want within your climate you will be increasing your chances of success. Everyone fails at sometime. It is only those who learn from their failures who can cut their losses and improve their opportunity for success. The more I learn about my garden, the better I increase my chances of getting something right. As Thomas Edison once said, “I have not failed. I’ve just found 10,000 ways that don’t work.”

Does Soil Inoculant really work?

When I have problems with digestion I often benefit from eating yogurt that contains the Acidophilus bacteria. There are products that can help a plant’s roots, like yogurt can help a person’s stomach. These products are often made out of nitrogen-fixing bacteria (rhizomes) and are touted as helping legumes get good head-start. Products in this class are often loosely referred to as “soil inoculants”.

Yogurt contains beneficial bacteria.

At first I thought that rhizomic soil inoculant was some kind of propaganda marketed by gardening companies to lure gullible gardeners into spending more money on their products. However, a recent experience has taught me otherwise. A while ago I had been given a gift certificate from a family member to a large seed company. I could not find too many open-pollinated seeds in their catalogue so I chose to add soil inoculant to my purchase. I didn’t think the inoculant did too much the first time I tried it and I had nothing to compare it to. In hindsight though, my first crop of peas was better than any other crop I have had since.


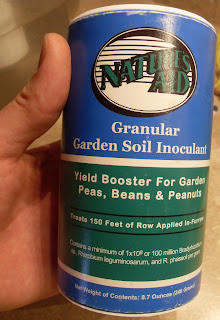
Soil Inoculant contains beneficial bacteria.

I have been growing Chinese Long Beans the last few years and have noticed that they often take a while to sprout. Recently I tried soaking my Chinese Long Beans overnight, then draining the water and rolling the seeds in soil inoculant. Within a few days half of the seeds began sprouting. They continued to sprout again and again. I have never seen such high germination in this seed variety and can only attribute it to the soil inoculant. Since then the beans have continued to grow at an accelerated rate in comparison with growing them in years past. I don’t believe that using soil inoculant for legumes is the only thing legumes need, though I do believe the inoculant helps germination rates, increase plant vigor, and speed up the time between sowing bean seeds and reaping a crop.

Step 1: Soak Beans overnight

Step 2: Put soil inoculant in a container.

Step 3: Rinse out beans

Step 4: Mix inoculant with beans

Step 5: Plant beans with inoculant

Step 6: Watch your plants grow!

There are a variety of soil inoculants out there and I cannot speak to the effectiveness of any other variety than the one I used. Some have a few good bacteria varieties while others contain a host of beneficial organisms. One farmer even conducted an unbiased comparison of the affect of using inoculants (and some other things) in his soilGiven my recent success with soil inoculant I will definitely consider investing in these bacteria in the future.

Tuesday, April 10, 2012

Of Sparkler Radishes and Little Girls

Should you have the good fortune of meeting Reggie Smith, the owner of Westwind Seeds, she will gladly tell you about her experience as a child with Sparkler Radishes, which inspired her love of gardening and seeds. My daughter happened to be the fortunate recipient of some of Reggie’s Sparkler Radish seeds. From that time until I gave in, my daughter asked me again and again to plant her seeds. Though it took me some time to make a spot in my summer garden (the kids’ garden was being pasteurized) I eventually found a spot she could plant her radishes.

Daughter with Sparkler Radish Seeds.

To give you a background on Sparkler Radishes they are red, round, and are in the mid-spicy range for heat. Some of the radishes can be quite hot while others can be quite mild. In any case, they are your regular grocery-store type radish.

My daughter showing off her Sparkler Radishes

Within a few days of my daughter planting her Sparkler Radishes she came into the house shouting “My plants are growing, my plants are growing!” Each day she checks on the plants when she wakes up and when she comes back from school and each day she says the same thing.

A 2-week old Sparkler Radish - They grow quick!

So, what am I growing these days? Children. Well – more like raising them. And I find it much more rewarding then my garden will ever be. Gardening helps me to find correlations between my family and my garden like this: What is the similarity between Sparkler Radishes and little girls? They both grow up quick!

Little girls - they grow quick!

Tuesday, April 3, 2012

For the Love of Spinach


The pattern has endured throughout garden history…

The boys come along,


They meet up with the girls,


Love is in the air,


Male Spinach seeds releasing pollen

And seeds are formed.

Spinach Seeds being formed near the stalk.

For further questions, go ask your Mom and Dad.


It came as a surprise to me that spinach plants grow up to be either male or female, and do not have both the male and female flowers on the same plant. The term for this is dioecious, meaning two houses. One way you can imagine this is having all the boys in one house (plant), with all the girls in another house (plant). As long as they are in the same area, seed will be formed.

Seed to Seed recommends having a minimum of 4 female plants and 2 male plants to continue the vegetable variety without any detrimental inbreeding. I laughed at this, because you cannot determine which is male or female until the stalks grow. So the basic rule of thumb is the more the better. As spinach requires a large isolation distance to retain varietal purity, small-scale gardeners may find it easiest to save seed from one variety per season.
 

Seed to Seed

One of the things I enjoy about gardening is the vast amount of knowledge needed to grow just one vegetable. It is truly miraculous that, despite all of our blunders as gardeners, a plant will sprout, grow and - at times - flourish. The last book I read by Carol Deppe about Breeding Your Own Vegetable Varieties sited the book Seed to Seed as having information that I really wanted to know about growing melons. Seed to Seed turned out to have all of that information and so much more!

 The book Seed to Seed is written by Suzanne Ashworth in collaboration with the Seed Saver’s Exchange. The first part of the book is a wonderful read that overviews the importance of seed saving, explains how botanical classification works, elaborates on pollination and flower structure, gives ideas on maintaining varietal purity as well as proper techniques for cleaning and storing seeds.

The second (larger) section of the book goes over all the major vegetable families and gives information about many common and rare vegetable varieties. Each plant section contains an introduction to the plant, its botanical classification, a section on pollination crossing and isolation, a section on seed production harvest and processing, and seed statistics. The individual plant sections also contain recommendations from master gardeners in each region of the United States. These gardeners suggest appropriate planting dates and often elaborate on how to care for the plant in the specific area.

So, here is a little of what I learned from reading this book:

A perfect flower contains both the male and female parts of the plant in one place and is able to pollinate itself. An example of a perfect flower is a tomato flower.

Ozark Pink Tomato Blossoms mutate in Tucson's late-summer heat

A monoecious plant is one that has two separate flowers for male and female on the same plant. Two examples of monecious plants are melons and cucumbers.

Cucumbers and melons exhibit monecious flowers

A dioecious plant is one where each plant has either male or female flowers and both are needed to pollinate. An example of this is spinach.
 
Dioecious  female spinach requires a male spinach plant

 A self-incompatible flower is one in which requires bees or people to pollinate it, as the flower is perfect but will not form seeds if pollinated by itself. An example of a self-incompatible flower is broccoli or cauliflower.
 
Brocolli flowers are self-incompatible

Additional fun things I learned included the word “rouge”, which means to remove off-type plants and guidelines for using hot water to kill pathogen on seeds. Reading about the vegetable varieties made me eager to try out some new vegetable varieties such as the Jelly Melon.

Seed saving is a valuable skill worth developing!

Saving seeds from your garden can allow you to become more self-sufficient. Perhaps your local nursery won’t be as happy about you producing your own seed, but your finances will, and along the way you can develop skills that will enable you to be prepared for things to come. As I harvest my own seed my hope is that, if I had to, I could support my family from the food I grow.